Screencast-o-matic on the Macbook
A step-by-step tutorial
 We helped one of our partner schools, Wallingford Elementary in Wallingford, Vermont, get set up with screencasting for their MacBook-based 1:1 environment, and they taught us a ton about the tech tool decision-making process along the way.
So here, soup-to-nuts is a step-by-step tutorial for using Screencast-o-matic on the MacBook for recording screencasts for Google Site e-portfolios. With bonus screencast!
Why Screencast-o-matic?
For a powerful technology, screencasting is pretty deceptive: it looks like it should be super-simple to get a high-quality video, but the reality for schools is that there are a ton of variables to consider. Are you a Google school? Do students have their own Google Plus accounts? What does it take to install software or apps on your devices? Where are the end products going to wind up?
Here’s a comparison of several free screencasting platforms we looked at:

Based on looking at the features and constraints listed above, we recommended Screencast-o-matic to Wallingford: it’s free, students don’t need to create accounts and you can export the results to Google Drive, and from there embed to Google Sites, which is what the school uses for their e-portfolios.
Also when we tried it, we found it to be easy to use and have a couple of nice features: you can optionally highlight the cursor, include footage from the webcam with the screencast or just record from the webcam only. This last feature in particular could be great for middle-level adolescents reflecting on identity.
Getting set up with Screencast-o-matic on the MacBook
1. Install the software by clicking the big blue Start Recording button.

Although this doesn’t seem logical, clicking this button will cue the software to start downloading, and allows you to bypass the account creation step. Go through the Mac’s standard software installation process: double-click the open box and allow the installer to run, then drag the resulting file to your Applications directory.
2. Double-click on the Screencast-o-matic icon in your Applications folder to start recording. You can also launch the recorder from your browser by clicking the “Start Recording” button again.
How it works

The left lower corner of the image above shows the controls for recording. You can choose whether to record just your screen, just your webcam, or your screen and your webcam at the same time. Go ahead and say a few words, and you should see the dark bar to the left of the microphone icon light up green, next to “Narration”. In the far lower left corner, you see a red Record button, as well as where to Cancel out of the screen.
Troubleshooting
We found that the way Screencast-o-matic on the Macbook is set up, when you open the Recorder to start recording, AND IF you keep your Mac Dock at the bottom of your screen, you will need to make sure the Dock is set to hide, otherwise it will cover the Screencast-o-matic tools.

You can set your Dock to hide, and only appear when you move your cursor to the bottom of your screen by going to System Preferences > Dock > Automatically hide and show Dock.

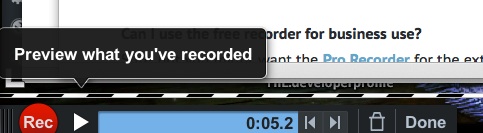
When you’re ready to record, hit the red “Rec” button in that lower left corner. You’ll get a 3-second count-in (“3…2…1…Go!”) and then you’re off and recording. When you want to stop recording, click on the blue pause icon button that’s replaced the red Record button. At this point you can preview what you’ve just recorded (and decide whether to record it again) or you can just click “Done” and finalize your work for exporting to your e-portfolio.
Exporting the finished product for e-portfolios
You have a few different options for exporting: you can save it as an .mp4 (the universally accepted video file type for websites) on your machine, export it directly to YouTube or get it onto your Google Drive. The aim for Wallingford is to allow students to create screencasts to add to their e-portfolios, which are in Google Sites.

Adding a screencast to Google Drive
To add your finished screencast to a Google Site:
- Save it to your machine as an .mp4
- From your browser, go to your Drive and select New > File Upload > your_screencast_filename.mp4
- Log into your Google Site, and pop into Editing mode (click the little pencil icon)
- Navigate to where you want your video to appear and click Insert > Drive > Video

Thank you to super-smart Shrewsbury educator Sabrina McDonough for figuring out this process and teaching the rest of us! You guys, it takes a village. A village of educators.

Screencasting with Screencast-o-matic (@Screencasto) for your Google Site #eportfolios https://t.co/RUJ61fnwC3 https://t.co/6irvHX7V5o
RT @innovativeEd: Screencasting with Screencast-o-matic (@Screencasto) for your Google Site #eportfolios https://t.co/RUJ61fnwC3 https://t.…
We step through why and how to use screencast-o-matic on the MacBook for educators with one of .. https://t.co/XmnB3Gp1a9 #Disrupt