
You’ve captured video of ALL THE THINGS. You’ve diligently trained your device on the action as some truly amazing work has gone down in your school. You’re excited to have a video you can share with families, with the school board and add to your PLP portfolio. And now you’re just sitting there, overwhelmed by it all. Wondering how in the world you’re going to get from an iPad full of footage, to finished. You’re wondering how to make a mini-documentary.
So… now what?
Now it’s time to get from footage… to finished.
Getting from raw footage to finished video can feel overwhelming. A lot of times what you’ve shot may make the best sense only within a larger context. But how are you going to tell your story?
Here is one way to make a small, manageable documentary-style film from your footage. There are tons of other ways you can try, including going to film school. But this way should only take you one afternoon.
Behold: “All Fried: Carolina Fish Camps”
All Fried: Carolina Fish Camps from Southern Foodways on Vimeo.
Watch this video. It’s six minutes long and it will make you ridiculously hungry for fried food. After you watch it, we’ll talk you through a way to make your own school-related version of it out of three things: a good interview, some listening skills and B-roll.
But first, the fish. Get to the watching.
Now, what did you just watch?
You watched a person — in this case a university professor — telling the story of a practice they like — eating at fish camps — and explaining why they like it.
That’s it. An interview punctuated by interesting visuals that helped explain the interview. And even if fish aren’t your deal, now you have one way to take a very big and overwhelming topic and make a compelling video about it.
And you’re going to do this by:
- Shooting an interview;
- Grabbing its soundbites;
- Adding B-roll, and
- Getting fancy.
Let’s jump in.
1. First, get a good interview
Decide who is be the best person to tell the story of your school project. That person is going to be the narrator of your documentary.
Grab your gear and a partner
We use this setup to record most of our interviews:
- an iPad
- an iOgrapher case mounted on a tripod, and
- a Rode VideoPro mic.
We use it because it’s durable, relatively low-cost and super easy to use. There are tons of other setups out there, and whichever one you use is awesome. You’re doing absolutely amazing and none of us are going to Cannes tomorrow. Let’s ease into this.
Now, using the plain old Camera app, you’re going to find a quiet space, make sure your microphone is on, and record a simple but informative interview.
After you’ve made sure your microphone is on, you’re going to answer these five questions:
- What is it you’re doing?
- What’s the most challenging part about it?
- What’s the most satisfying part about it?
- What one piece of advice would you give to other teachers who’d like to try what you’re doing?
- If you had to do this over, would you change anything?
For your interview, get comfy. This works super well in pairs, but sometimes you just have to go it solo. As long as you have your questions and make sure you’re in a quiet space (and your microphone is on) you can make it work.
Some notes about the interview environment:
- Natural light from a window will make you look your stunning best. Or just go outside into the natural light. Go on. Shoo.
- If you’re outside you likely will want to have a wind muff over your microphone.
- Take a moment to make sure you’re not sitting under an AC vent or a fan, or next to an aquarium.
- If you can, find a small room to record in for good audio, or, because we’re being realistic about school settings, have the interviewee face a bookshelf or a breeze block wall. Look for a space with a low ceiling. Those are the types of features that will help you get great audio.
Finally, make sure you see black bars at the top and bottom of your iPad screen:
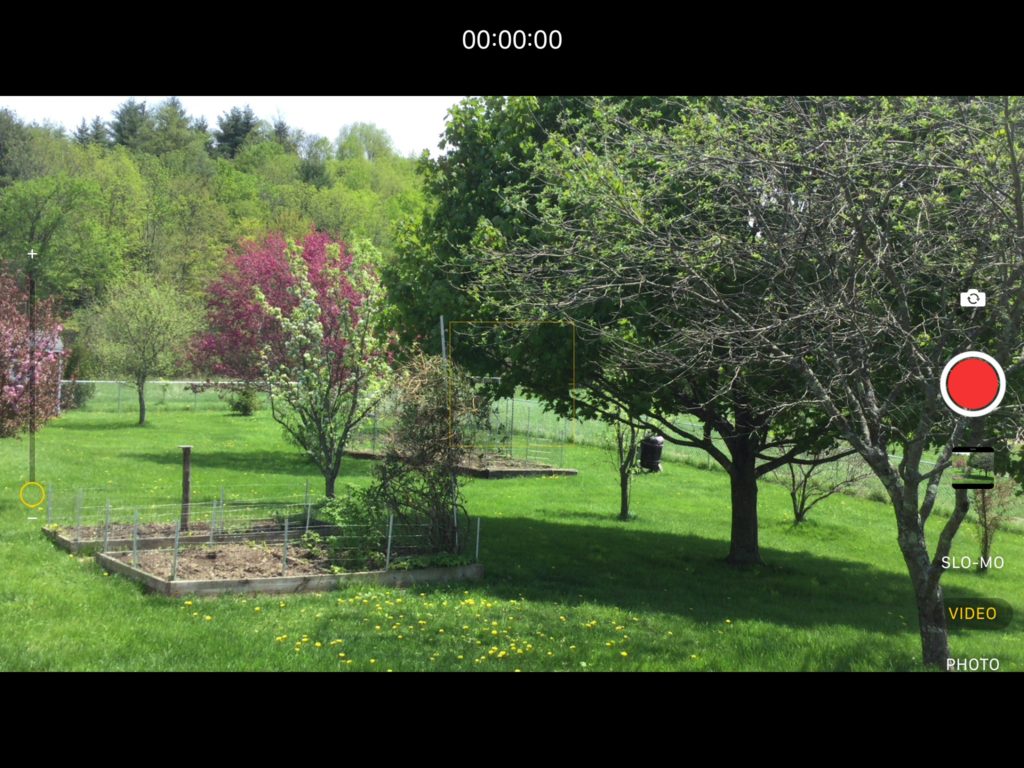
And hit the record button.
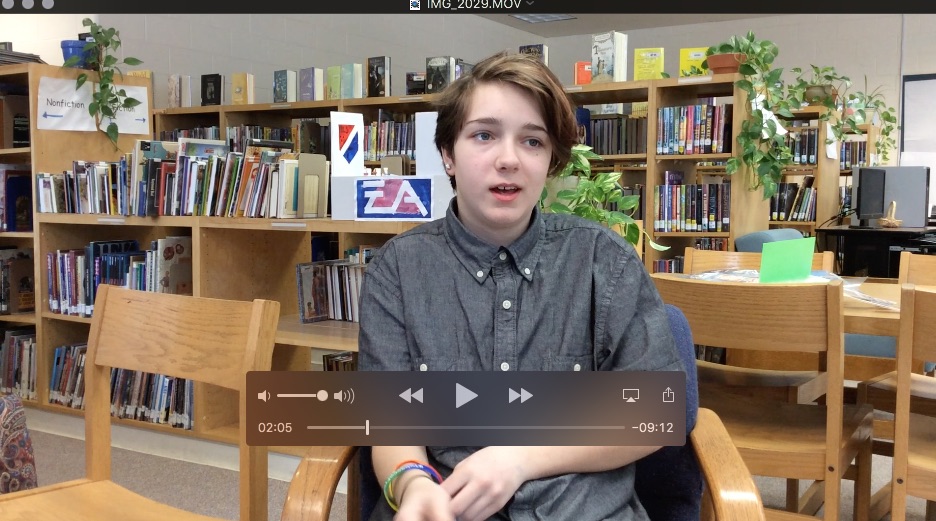
Interviewee, please start by introducing yourself with your full name, what grade you’re in (or what subject you teach, possibly both — you know yourself best) and what school you’re connected with.
Now let’s step through our five questions.
If you’re the interviewer, give those questions some breathing room, and don’t interrupt. If you feel yourself starting to “Mm-hm” or “Oh yeah!” realize that those will have to be edited out and, in the words of Her Own Sainted Self Tyra Banks, smize it out instead:

Smizing is the art of giving your interviewee encouragement to keep talking without actually making a sound. Less editing to do at the end.
2. Next, find your soundbites.
Now that you each have a good interview clip, you’re going to watch it back and figure out what your soundbites are. Those are the moments that make you nod your head, like, yes, that’s exactly what I want people to know about this project.
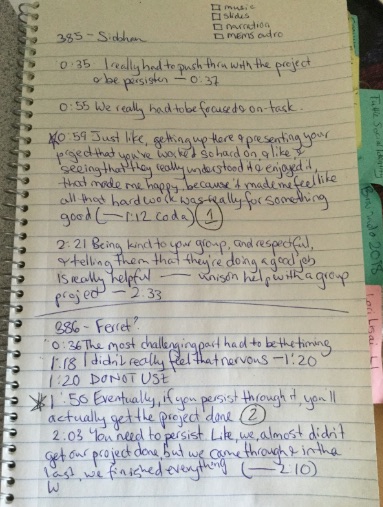
If you transfer your video to a laptop or desktop for editing, and open your interview clip in Quicktime, you’ll have that great timescale at the bottom of your clip:
Grab something to write with. Now, as you watch your interview, when you hear a soundbite, jot down the approximate time it starts and finishes, and some words or a phrase that will remind you why you liked it so much. Get through the entire video, and find those soundbites.
Then, rank your soundbites.
Start by starring the ones you really love, as opposed to the ones that were just pretty good. Then assign them numbers, number 1 being the best, number 2 the second best etc etc.
Now it’s time to crack open iMovie
Create a new Project in iMovie, and import your interview file. Drop it onto the timeline so the beginning lines up with 0:00.
You have your list of soundbites with approximate timestamps. Say you want to create a soundbite from 0:10 through to 0:23. Move your playhead to 0:10. Wiggle it around a bit until you’re a little before where the soundbite begins. Once you have your playhead in place, click on the clip so it turns yellow, then press command-B, or go up to the Modify menu and choose “Split Clip”. You have just made your first edit.
Click on the bits of the video you don’t want, the bits outside your edit, and hit Delete. They get deleted from your timeline.
Finally, go to the File menu, choose Share… and then File…
You get:
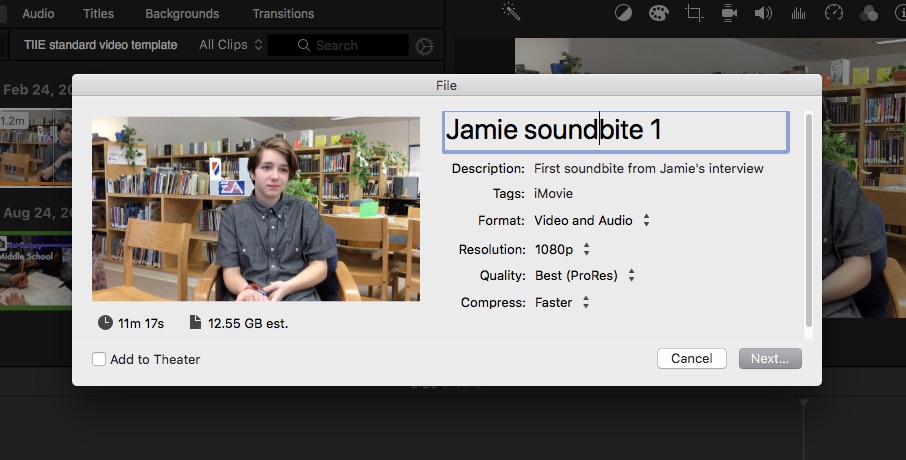
Repeat this process until you have a directory of soundbite files to work with.
Now, create a fresh iMovie Project and import them all.
You’re now going to arrange them on your timeline in a way that makes sense to you narratively. Don’t worry about your visuals yet, just figure out the story they’re trying to tell.
We try to put our favorite soundbite first in line, to draw people in. And we put our second-favorite soundbite last, as a coda to the whole story.
3. Add your B-roll to keep things moving
B-roll can consist of video clips or it can consist of still images you feel contribute to the points you made in your interview. In the Fish Camp story, you see a lot of B-roll of inside the restaurants, and the food being made, but when Dr. Criswell starts talking about how much he loves looking at the old menus, the visual cuts away to still images of menus. Totally awesome use of B-roll.
One of the most interesting things about the Fish Camp video is how much of the B-roll is tied to the nouns in Dr. Criswell’s story. When he says:
The fish camps were a place you could go, and feed your whole family, and not blow your paycheck (0:37-0:42)
(emphasis ours)
The B-roll that’s being shown on-screen at that time is of a group of similar-looking people, like a family, giving their order, which the waitress writes on the check.
When Dr. Criswell says:
And the portions were always generous. (0:46-0:47)
(emphasis is us again, we’re shameless)
The B-roll on screen is of a plate or portion of food. The amount of food on the plate is large, or generous.
When Dr. Criswell says:
The food at the fish camp had a direct relationship to the mill workers (1:20-1:23)
you see B-roll of mill workers.
So this is a great point at which to stop and ask: What are the nouns in your story, and do you have B-roll to illustrate them?
You can also shoot extra B-roll, if you’d like.
If you’re talking about how amazing it was to learn to tie your shoes, for example, take the media kit and film a partner tying their shoes. Maybe film over their shoulder or get down on their level with the tripod.
Two tips:
- Watch B-roll on fast-forward using the slider to control how fast it goes. You can get through a ton of footage just looking for interesting pieces of movement that catch the eye. Note the filenames and approximate timestamps. It’s easier to pull B-roll in as large chunks and fasten it in place, then adjust.
- Look back at your soundbites for interesting movement. If you got really heated about the chihuahua story and did a lot of gesturing with your hands or imitated its facial expressions, that’s really interesting to look at. Think about whether you really need to cut to B-roll there, or whether you telling the story is enough on its own.
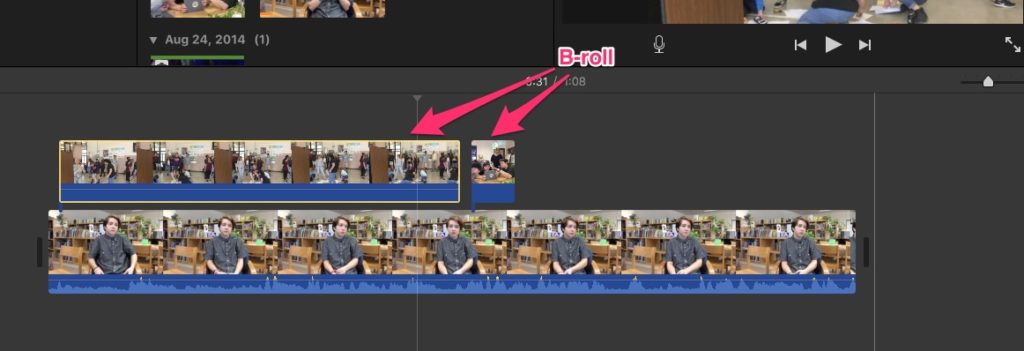
Over in iMovie, start importing your B-roll into your project.
Command-I is your friend, people.
Once you have it in your project, add a piece to your timeline by selecting the clip and placing it above your existing timeline:
3.5 Stop and take stock of your work
Try this as a starting exercise: add in your top three soundbites, and some B-roll, then watch your story. Do you like what you’ve made? What’s missing? Did you get all your nouns? Do you need to shoot more B-roll?
…
Aaaaaaaaand breathe.
4. Get fancy with it: titles and background music
You didn’t think we were done, did you? P’shaw, we’re just getting started.
But as you go back and watch the Fish Fry (yes again; just one last time), ask yourself:
- When does the title appear?
- What does the title appear over?
- Is there background music?
- When does it come in? How long does it hang around for? And what word would you use to describe it as a mood?
And now for the obligatory piece about copyright
There are many fine pieces of music you can use for background to your documentary that are generously made available for Creative Commons use. Some good places to look are at the Creative Commons site itself, and over on Soundcloud, where you might find some lists that surprise you…
A huge shout out to the fine folks at the Southern Foodways Alliance, especially “All Fried” director Ava Lowrey for making this and other fine documentary pieces.
Here’s one we made earlier:
